When trying to figure out what size charge controller you’ll need for your 800W system, you’ll need to consider 3 ratings:
- The Battery voltages (12V/24V/48V) that the charge controller is designed to operate with.
- The Output Current rating of the charge controller (in Amps).
- The Maximum Input Voltage rating of the charge controller (in Volts).
These ratings will need to match the specifications of your system.
In this article, I will show you how to use the specifications of your solar panels and battery bank to select the right MPPT charge controller for your 800W system or even for future system expansion.
If you’re in a rush, you’ll find a direct answer below, and you’ll also find a link to a tool that can do all the sizing for you. However, I recommend reading the entire article.
Let’s get to it.
What size charge controller for an 800w solar panel?
In general, if your battery bank has a nominal voltage of 48 Volts, you would need a 20-30 Amp MPPT charge controller. If your battery bank is rated at 24 Volts, you would need a 40-50 Amp MPPT charge controller.
However, the Maximum Input Voltage rating of the charge controller must be greater than the maximum voltage your 800W solar array is capable of producing.
Generally, if your solar array is rated at 24V (nominal), the Maximum Input Voltage of the charge controller must be 60V or more (preferably 100V). If your solar array is rated at 48V, the Maximum Input Voltage of the charge controller must be 120V or more (Preferably 150V).
In addition to the Output Current and Input Voltage ratings of the charge controller, you’ll also have to make sure the charge controller is rated to operate at the voltage of your battery.
Most charge controllers can operate at 12V and 24V, but not all of them are designed to operate at 48V. If your battery bank is rated at 48V, make sure to check the battery voltage rating of the charge controller before you make a purchase.
Now, you can directly use our MPPT Calculator to find the right charge controller size for your 800W system. But, if you’d like to get a better understanding of this, in the next section, I’ll give an example of an 800W solar system and I’ll show you the step-by-step way of sizing an MPPT charge controller for that system.
How to size an MPPT charge controller for your 800W solar system: Example
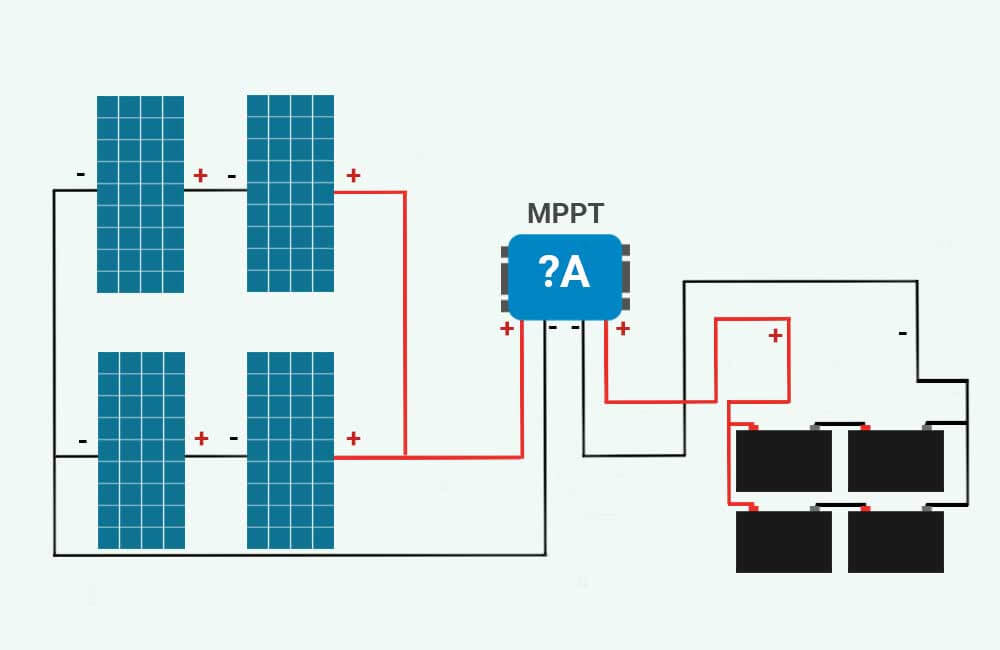
In this example, I’ll assume that our 800W system consists of 4 12V-200W solar panels wired in a parallel-series configuration. I’ll also assume that our solar array is connected to a battery bank that consists of 4 12V-100Ah LiFePO4 batteries that are also wired in a parallel-series configuration.
This means that the nominal voltage of our system (both solar array and battery bank) is 24 Volts. The system would look something like this:
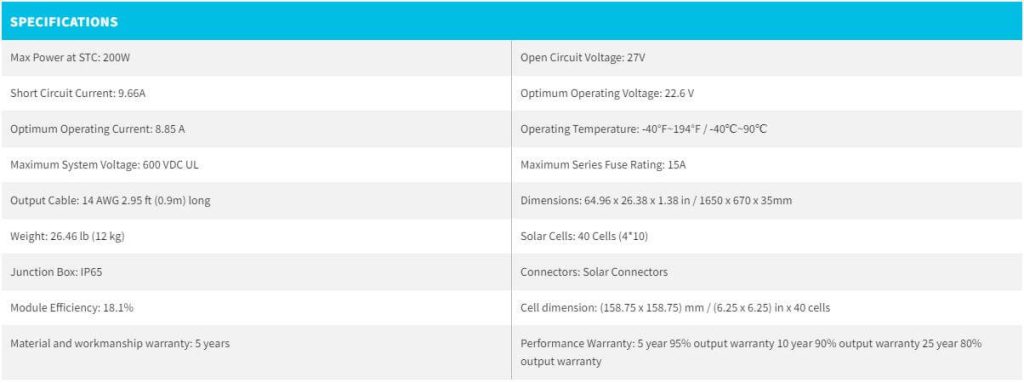
Now, let’s assume that the solar panels used in our system are these 200W solar panels from Renogy. Here are the technical specifications of these solar panels:
First, we’re going to determine the Output Current rating required from our MPPT charge controller.
Determining the required Output Current rating of the charge controller:
Power (Watts) is the product of Voltage (Volts) and Current (Amps):
Power (in Watts) = Voltage (in Volts) x Current (in Amps)
The job of a charge controller is to decrease the voltage from the solar array to match the voltage of the battery bank, and therefore protect the battery bank from overcharging. Read more about this here.
Now, if you look at the Electrical Power formula above (P = V x I), you’d logically deduce that a decrease in Voltage (Volts) would also mean a decrease in Power (Watts).
However, what makes MPPT charge controllers very efficient (as opposed to PWM charge controllers), is that while they decrease the voltage they simultaneously increase the current by the same ratio. As a result, the amount of power generated by the solar panels stays the same (800W).
In other words, if we know:
- The maximum amount of power (Watts) that we’d like the MPPT charge controller to output.
- And the minimum voltage at which our MPPT is supposed to output that amount of power.
We can determine the amount of current that our MPPT should be capable of delivering at its output, which is the Output Current rating we’re looking for.
We know that our MPPT should be capable of outputting 800 Watts of power. And following our example, we also know that our battery bank is rated at 24 Volts (nominal).
However, the voltage of the battery bank will not be a constant 24 Volts all the time but will fluctuate relative to the State Of Charge (SOC) of the battery. For example, the following image shows the voltage of a 12V battery relative to its state of charge:
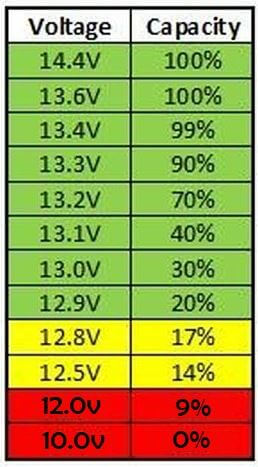
When this 12V battery is depleted (0% SOC), its voltage is 10 Volts. Since our battery bank is rated at 24V, when it’s fully discharged, its voltage will be approximately 20 Volts.
In order to be able to charge the battery, the voltage at the MPPT’s output will always be slightly higher than that of the battery bank:
| Nominal Voltage of the Battery Bank (Volts) | Battery Voltage at 0% State Of Charge (Volts) | Lowest Battery Charging Voltage (Volts) |
| 12V | 10 V | 10.5 V |
| 24V | 20 V | 21 V |
| 48V | 40 V | 42 V |
If the voltage of the battery bank is 20 Volts, the MPPT will deliver about 21 Volts at its output.
This is the lowest voltage at which the MPPT will charge the battery, and since the amount of power doesn’t change, it is the voltage at which the MPPT will output the most amount of current.
In other words, we can calculate the maximum amount of current that our MPPT charge controller has to be able to output by dividing the power rating of our solar array by the lowest charging voltage:
Output Current rating of the MPPT (Amps) has to be greater than Power Rating of the Solar Array (Watts) ÷ Lowest Battery Charging Voltage (Volts)
Output Current rating of the MPPT (Amps) has to be greater than 800 Watts ÷ 21 Volts
Output Current rating of the MPPT (Amps) has to be greater than 38 Amps
According to our calculations, the MPPT has to have an Output Current rating of 38 Amps or more. A 40 Amp MPPT would be a nice fit for our 800W system.
Now, that we’re done with the first rating, let’s move on to the Max. Input Voltage rating of the charge controller.
Determining the required Max Input Voltage rating of the charge controller:
As mentioned above, charge controllers have a limit on how much voltage is allowed at their input. This limit is indicated by the manufacturer either explicitly on the charge controller itself, or in the documentation.
Either way, you’ll need to make sure that the maximum amount of voltage your solar array is capable of producing does not exceed the Input Voltage rating of the charge controller you’ll be using.
How do you do that?
First of all, you’ll need to know the following:
- The 12V, 24V, or 48V voltage rating of a solar array is not the actual voltage of the array, but only the nominal voltage used to categorize it.
- The maximum voltage that a solar panel is capable of producing is referred to as the Open-Circuit Voltage (Voc) and is usually specified by the manufacturer. For example, a solar panel that is categorized as a 12V panel will have an Open-Circuit Voltage between 19 and 29 Volts, depending on the solar panel.
- The Open-Circuit Voltage (Voc) that a manufacturer specifies for their solar panel is for a temperature of 77°F (about 25°C)(Standard Test Condition). With temperatures below 77°F (about 25°C), the Open-Circuit Voltage of the solar panel will actually exceed the rated value.
So to determine the maximum amount of voltage your 800W solar array is capable of producing, you’ll first need to determine the Open-Circuit Voltage of the solar array.
If we look at the specifications of the solar panels used in our example, we can see that Renogy specifies 27 Volts as the Voc of each solar panel.
In our example, we have 4 identical solar panels wired in series-parallel (2 parallel strings, 2 solar panels in series in each string). Therefore, the total Open-Circuit Voltage of our 800W solar array is equal to the Open-Circuit Voltage of one string.
And the Open-Circuit Voltage of one string is equal to the sum of the Open-Circuit Voltages of 2 solar panels.
Learn more about the voltage and current of solar panels in series, parallel, and series-parallel here.
So, the Open-Circuit Voltage of our 800W solar panel is:
Open-Circuit Voltage (Volts) = 27 Volts + 27 Volts
Open-Circuit Voltage (Volts) = 54 Volts
However, as mentioned above, this Voc that we’ve just calculated is for a temperature of 77°F (about 25°C). If the temperature during the day (when the solar panels are receiving sunlight) goes below 77°F (about 25°C), the Voc of our solar array will exceed 54 Volts.
Exactly how high the Voc gets, will depend on how low the temperature during sunlight hours gets.
Thanks to the Temperature Correction Factors provided by the U.S National Electrical Code (NEC Table 690.7 (A)), we can estimate this potential increase in the Open-Circuit Voltage of our solar array:
| Ambient Temperature (°F) | Correction Factor | Ambient Temperature (°C) |
| 68 to 76 | 1.02 | 20 to 24 |
| 59 to 67 | 1.04 | 15 to 19 |
| 50 to 58 | 1.06 | 10 to 14 |
| 41 to 49 | 1.08 | 5 to 9 |
| 32 to 40 | 1.10 | 0 to 4 |
| 23 to 31 | 1.12 | -5 to -1 |
| 14 to 22 | 1.14 | -10 to -6 |
| 5 to 13 | 1.16 | -15 to -11 |
| -4 to 4 | 1.18 | -20 to -16 |
| -13 to -5 | 1.20 | -25 to -21 |
| -22 to -14 | 1.21 | -30 to -26 |
| -31 to -23 | 1.23 | -35 to -31 |
| -40 to -32 | 1.25 | -40 to -36 |
Corrected Open-Circuit Voltage (V) = Open-Circuit Voltage (@ 77°F) x Correction Factor
For example, let’s say that in the winter, and during sunlight hours, our 800W solar array can potentially be exposed to temperatures as low as 15°F (-10°C).
If we look at the table, we can see that for temperatures between 14 and 22°F (-10 and -6°C), a correction factor of 1.14 must be applied to our Voc:
Corrected Open-Circuit Voltage (V) = Open-Circuit Voltage (@ 77°F) x Correction Factor
Corrected Open-Circuit Voltage (V) = 54 Volts x 1.14
Corrected Open-Circuit Voltage (V) = 61.5 Volts
So, our charge controller has to have a Maximum Input Voltage rating of more than 61.5 Volts.
I described the system from our example to our MPPT Calculator, and it suggested this MPPT charge controller from Victron. This charge controller can operate with 12 or 24V battery banks, can output up to 50 Amps of current, and can handle up to 100 Volts at its input.