Running an RV air conditioner on solar is definitely doable, but for this to work, you’ll need to know a little bit more about your AC’s power usage and energy consumption.
Furthermore, you’ll need more than just solar panels. A solar installation that could run an RV air conditioner would consist of:
- Solar panels
- A solar charge controller
- A battery bank
- An inverter
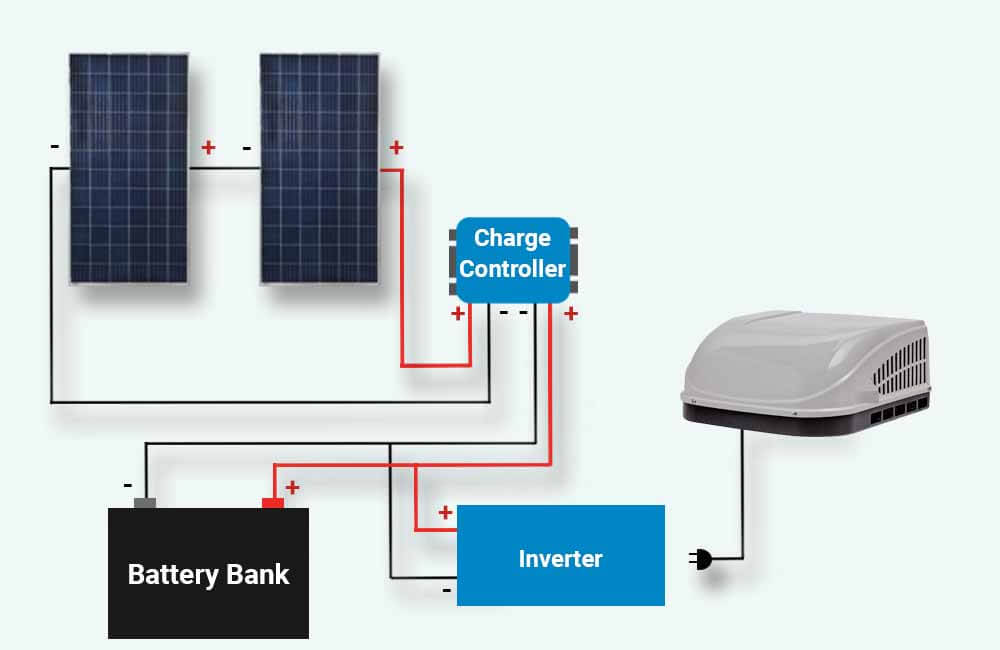
In this article, I’ll explain what each of these components is, why you need them, and how to size each of them correctly for comfortability and optimal operation.
How many solar panels do I need to run my RV AC?
On average, and provided that you have a battery bank, you would need 200 to 300 watts of solar power to run an RV air conditioner for 1 hour. For example, if you run your RV A/C for 4 hours every day, you would need 800 to 1200 Watts of solar panels.
However, depending on factors like temperature, season, and parking location, you might need less or more solar power.
In any case, when sizing a solar array, there are 2 important questions to ask:
How much energy do you want to offset?
In this case, this question translates to “how much energy does your RV AC consume?“. The answer to this question will determine the amount of energy (in Wh or kWh) that your solar panels should be able to produce on a daily basis.
How much sunlight will your solar panels get?
The answer to this question will help you determine the size of the system (in W or kW) that could produce that amount of energy.
Let’s begin with the first question.
How much energy does your RV air conditioner consume?
Energy is measured in Wh (Watt-hours) or kWh (kiloWatt-hours), with 1kWh equal to 1000 Wh.
In general, an RV AC is rated at 13500 or 15000 BTUs, and consumes 1 to 1.5 kWh of energy for every hour that it is on. Some RVs have 2 AC units and would require double the amount of energy to run these units.
However, other than the capacity of the air conditioner, its energy consumption depends mainly on the outdoor temperature.
For example, in the following table, you’ll find estimates of the energy consumption of AC units with different BTU ratings, at 2 different temperatures:
| BTU rating | est. Hourly Energy Consumption (kWh/hour) @ different temperatures | |
| around 85°F | around 95°F | |
| 12000 BTUs | 0.9 kWh/hour | 1.1 kWh/hour |
| 13500 BTUs | 1 kWh/hour | 1.2 kWh/hour |
| 15000 BTUs | 1.1 kWh/hour | 1.4 kWh/hour |
| 27000 BTUs | 2 kWh/hour | 2.4 kWh/hour |
| 30000 BTUs | 2.2 kWh/hour | 2.8 kWh/hour |
Please note that the purpose of the values in this table is to give you an idea about the energy consumption of these AC units.
Due to factors such as temperature, humidity, insulation, age of the unit, duct conditions, etc., it is impossible to predict the exact energy consumption of an air conditioner. The best way to get accurate values is to use an electricity usage monitor.
Devices like the Kill-A-Watt meter can help you monitor the power usage and the energy consumption of your air conditioner.
Click here for more information about this topic.
How much sunlight will your solar panels receive?
In general, sunlight is measured in W/m2 (Watts per square meter), and solar panels need exactly 1000 W/m2 (1 kW/m2) of sunlight to produce 100% of their rated power.
For example, a 100W solar panel will only produce 100 Watts at a given moment if it receives 1000 W/m2 of sunlight at that given moment.
Related: do solar panels need direct sunlight to work?
Based on this fact, if you know the power rating of a solar panel, and how much sunlight energy it will receive, you can calculate how much energy it will produce.
Reversibly, if you know how much energy you need the solar panels to generate (i.e. the energy consumption of your RV AC), and you know how much energy you’ll be getting from the sun, you can calculate the size of the system that you require.
But, how do you measure sunlight energy?
To measure sunlight energy, we use a conventional unit called Peak Sun Hours (PSH). With 1 Peak Sun Hour being equivalent to 1 kWh/m2 (1000 Wh/m2) of sunlight energy.
For example, let’s assume we have a 100W solar panel that receives 700W/m2 of sunlight for 3 hours. At the end of these 3 hours, the solar panel would have received exactly 2100 Wh/m2 of sunlight energy.
The same panel could be said to have received 2.1 Peak Sun Hours. Its energy production can be calculated as such:
Energy production (Wh) = Solar Panel Rating (W) x Peak Sun Hours
Energy production (Wh) = 100 W x 2.1
Energy production (Wh) = 210 Watt-hours
Since we want to calculate the wattage rating of the solar array, we can use this formula:
Solar Panel Rating (W) = Energy consumption (Wh) ÷ Peak Sun Hours
Assuming you’ve already determined the energy consumption that you want to offset (For example 2.5 kWh to run the AC for 2 hours every day), all you need is a Peak Sun Hours value.
So, how many Peak Sun Hours do you get?
The amount of sunlight energy that a certain location receives will differ from day to day and will depend on things like the season, how clear the sky is, etc…
However, with tools such as the PVWatts calculator, provided by the National Renewable Energy Laboratory (NREL), you have access to the average yearly (or monthly) Peak Sun Hours in your location.
To access the data, all you have to do is click here and submit the address at which the RV will be parked:
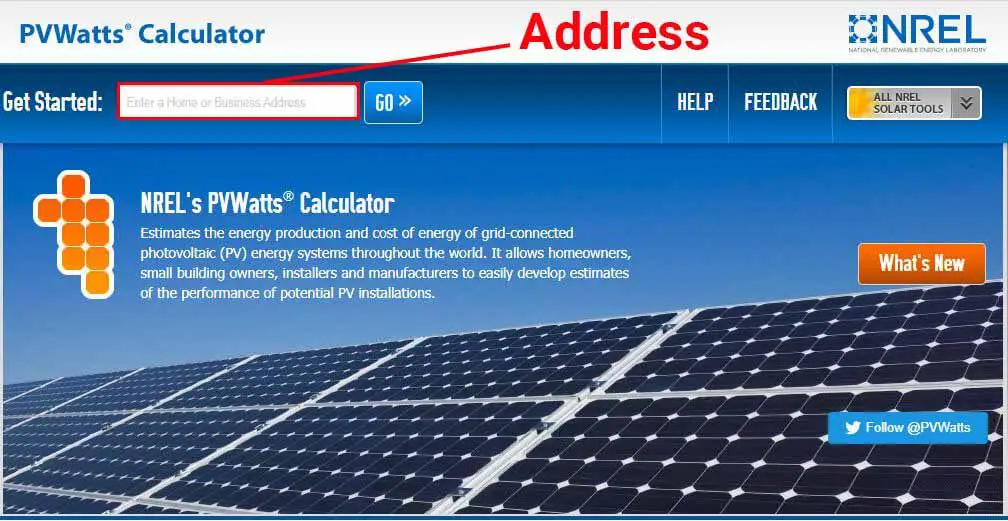
For example, I submitted Moab, Utah as my destination. In the results section, the tool estimates that – on average – this location receives 5.93 Peak Sun Hours per day, which is equivalent to 5.93 kWh/m2 of sunlight energy per day.
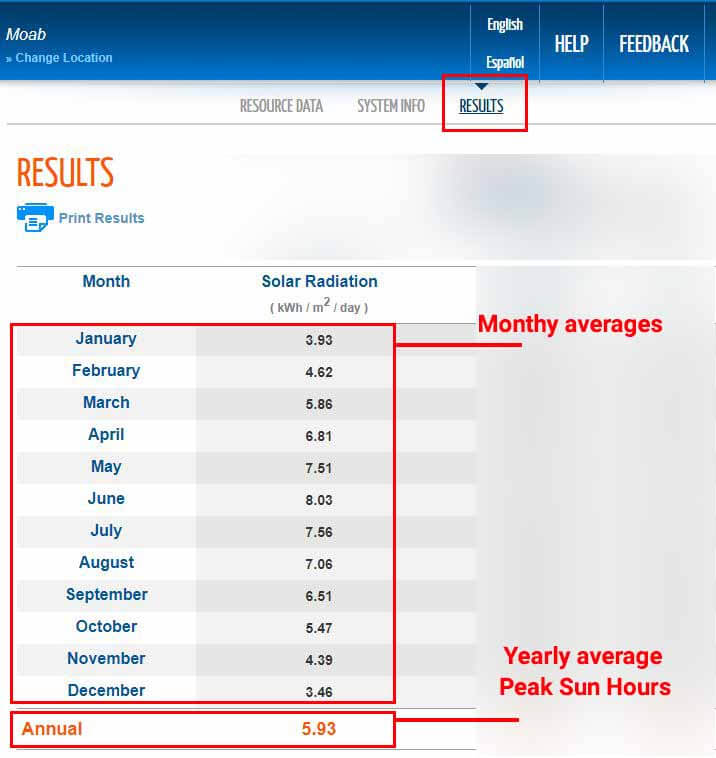
Another great feature of this tool is that it also shows you the average Peak Sun Hours for a particular month, which is quite useful. For example, if you go on camping trips in a particular month each year, you can use Peak Sun Hours from that month.
If you don’t have a particular month in mind, you can use the yearly average value.
Additionally, if you don’t have a particular location in mind, you can use a whole state as a location. The tool will estimate the average Peak Sun Hours for the whole state.
Once you determine the Peak Sun Hours that’ll you be working with, the rest is easy.
How many solar panels do you need to run your RV air conditioner?
To estimate the amount of solar power that you’ll need to run your air conditioner, divide the daily energy consumption of your AC by the number of peak sun hours that you receive each day:
Solar Panel Rating (W) = Energy consumption (Wh) ÷ Peak Sun Hours
For example, let’s say my air conditioner consumes – on average – 1.2 kWh of energy per hour, and I want to be able to run it for 3 hours a day. This means that my air conditioner will consume 3.6 kWh per day (3600 Wh/day).
Let’s also assume that I’ll be camping somewhere in Moab in March. PVWatts calculator estimates that this location receives 5.86 peak sun hours a day on average in March.
With these pieces of information, I can calculate the size of the system that I’ll need:
Solar Panel Rating (W) = Energy consumption (Wh) ÷ Peak Sun Hours
Solar Panel Rating (W) = 3600 Wh ÷ 5.86
Solar Panel Rating (W) = 614.33 Watts
This means that I’ll need around 600 watts of solar panels to be able to run my RV AC for 3 hours a day. Such a system would consist of 6 RV solar panels that are rated at 100 Watts, or 2 residential solar panels rated at around 300 Watts each.
In any case, the energy produced by the solar panels can’t be used directly. While the solar panels will produce 3.6 kWh of energy each day, this amount of energy will be produced over 8-12 hours.
To allow the AC to draw as much power as it needs, and to have access to the energy produced by the solar panels, you’ll need a battery bank. This brings us to the next step.
How many batteries to run your RV AC?
In an off-grid solar setup, the appliances draw power from the batteries, and the job of the solar panels is to compensate for that energy consumption.
For example, following our previous example, we would need a battery bank that provides 3.6 kWh of energy every day. However, there is a detail that we can’t afford to overlook.
The battery bank cannot be fully discharged. So whatever the size of the battery bank, it needs to provide that amount of energy (3.6 kWh in this case), without being completely depleted.
Fully discharging a battery will shorten its lifespan and will reduce its capacity.
How deep can you discharge the battery bank?
The recommended Depth of Discharge (DoD) of a certain battery depends on its chemistry. For example, while a standard Lead-Acid battery can only be discharged to 50% of its capacity without sustaining permanent damage, a Lithium battery (ex LiFePO4) can be discharged up to 90% of its capacity.
The following table provides the recommended Depth of Discharge for different battery chemistries:
| Battery Chemistry | Recommended Depth of Discharge (DoD) | Usable Battery Capacity of a 100AH battery |
| FLA (Flood Lead-Acid) | 50% | 50Ah |
| SLA (Sealed Lead-Acid) | 50% | 50Ah |
| AGM (Absorbed Glass Matt) | 50% | 50Ah |
| Li-Ion (Lithium Ion) | 80% | 80Ah |
| LiFePO4 (Lithium Iron Phosphate) | 80% | 80Ah |
Therefore, the size of the battery bank that you need will not only depend on how much energy it needs to supply, but also on its type.
What size battery bank do you need?
To calculate the battery capacity that you need, divide the amount of energy that the battery needs to supply by its recommended depth of discharge:
Battery Capacity (Wh) = Energy Consumption (Wh) ÷ Depth of Discharge (%)
For example, let’s assume I’ll be using Battle Born batteries. These batteries are Lithium Iron Phosphate batteries, which means they can be 80% discharged with no negative effects.
So the size of a battery bank that consists of these batteries, and that can supply 3.6 kWh (3600 Wh) of energy, can be calculated as such:
Battery Capacity (Wh) = Energy Consumption (Wh) ÷ Depth of Discharge (%)
Battery Capacity (Wh) = 3600 Wh ÷ 80%
Battery Capacity (Wh) = 3600 Wh ÷ 0.8
Battery Capacity (Wh) = 4500 Wh
The value that we’ve just calculated is the battery capacity in Wh. Since these particular batteries are rated at 12 Volts, we can determine the capacity in Ah (Amp-hours) by dividing the value by 12.
Battery Capacity (Ah) = Battery Capacity (Wh) ÷ Voltage
Battery Capacity (Ah) = 4500 Wh ÷ 12 Volts
Battery Capacity (Ah) = 375 Amp-hours
According to these calculations, we’d need at least 375 Amp-hours of battery capacity. This is equivalent to about 4 12V-100Ah lithium batteries.
Please note that some batteries such as this 24V-100Ah Ampere Time battery, are rated at 24 Volts. The capacity of this particular battery (2.4 kWh) is equivalent to 2 of the 12V 100Ah Battle Born batteries.
Make sure to take the voltage into consideration in these calculations.
As mentioned above, the battery bank will provide energy to the AC, and the solar panels will keep the battery bank full. However, the solar panels can’t be directly connected to the batteries.
To safely charge the batteries, you would need a solar charge controller.
The next section explains what a solar charge controller is, why you need it, and how to size it correctly.
What size solar charge controller do you need?
Solar charge controllers are electronic devices that connect solar panels to the battery bank. The 2 main purposes of a solar charge controller are to:
- Protect the batteries from overcharging
- Prevent the solar panels from draining the batteries at night
For more details, please refer to this article: What is a solar charge controller and what does it do?
There are 2 types of solar charge controllers being used today:
PWM stands for Pulse Width Modulation. These devices are the oldest of the 2 charge controller technologies and are the cheapest.
PWM charge controllers simply turn ON and OFF in a manner that reduces the voltage coming from the solar panels and makes it more acceptable to charge the battery bank.
This protects the batteries but also results in significant power losses.
MPPT stands for Maximum Power Point Tracking. Using transformer technology, and more processing power, these devices are the most efficient.
MPPTs solar charge controllers not only lower the voltage of the solar panels to match that of the battery but also raise the current by the same ratio.
By doing this, MPPTs protect the battery bank with marginal losses in power production. In addition to that, MPPTs influence the operation of the solar panels in a manner that makes them produce maximum power.
For the rest of this section, I’ll focus on MPPT charge controllers as they generally are the better option for RV solar.
Click here to read more about charge controllers in general, or here to learn more about MPPT charge controllers in particular.
How to size an MPPT solar charge controller for your system?
When trying to select the right MPPT charge controller for your system, you’ll need to look for 2 key specifications:
- Its maximum input voltage
- Its maximum output current
1- Maximum input voltage:
This specification relates to the input side of the charge controller, which is the side that connects to your solar panels. The MPPT you choose needs to be designed to handle the voltage from your solar panels.
For example, an MPPT charge controller that is rated at 100 Volts for its input voltage, can handle no more than 100 Volts at its input.
To choose the charge controller correctly, you’ll need to calculate the maximum possible voltage that should be expected from your solar panels.
This is done by adding the Open-Circuit Voltage of your solar panels that are in series together and multiplying that by the NEC’s temperature correction factor.
This is because the highest voltage that you can get from a solar panel is its rated Open-Circuit Voltage. But this rating is based on Standard Test Conditions (STC).
When the temperature goes lower than 77°F (25°C), the voltage of a solar panel will be higher than the actual rating.
Please refer to this article for a detailed explanation.
2- Maximum output current:
This specification relates to the output side of the solar charge controller and is the most important spec to look for.
When choosing an MPPT, make sure it has enough output current capacity to deliver all the current produced by your solar panels.
For example, an MPPT rated at 30 amps will not deliver more than 30 amps of current to the battery. If your solar panels produce more than 30 Amps at battery voltage at a given moment, the excess current and power will be lost.
The output current capacity that you need can be calculated by dividing the power rating of your system by the charging voltage of the battery bank. This calculation also includes a temperature correction factor.
In the rest of this section, you’ll find a calculator that does these operations for you, along with an example.
However, feel free to read more about this process here: How to select the right MPPT charge controller?
MPPT size calculator
To make this process easier for you, I’ve put together a calculator that does all of these calculations. All you have to do is submit some specifications that describe your system.
Based on these specifications, the calculator will provide the size of the MPPT that you need, along with a couple of links to suitable MPPT models.
Below, you’ll find an example that explains the values that you should submit to the calculator.
Following our previous example, we’ve estimated that we’ll need 600 Watts of solar power, coupled with 4 100AH lithium batteries.
Let’s say we use 6 of these 100W Renogy solar panels that each has the following specifications:
- Rated Wattage: 100 Watts
- Open-Circuit Voltage (Voc): 22.3 Volts
Now, a good configuration for this setup would be a 3S2P configuration.
This means that we’ll have 2 strings of solar panels wired in parallel, with each string consisting of 3 solar panels in series. Kind of like this:
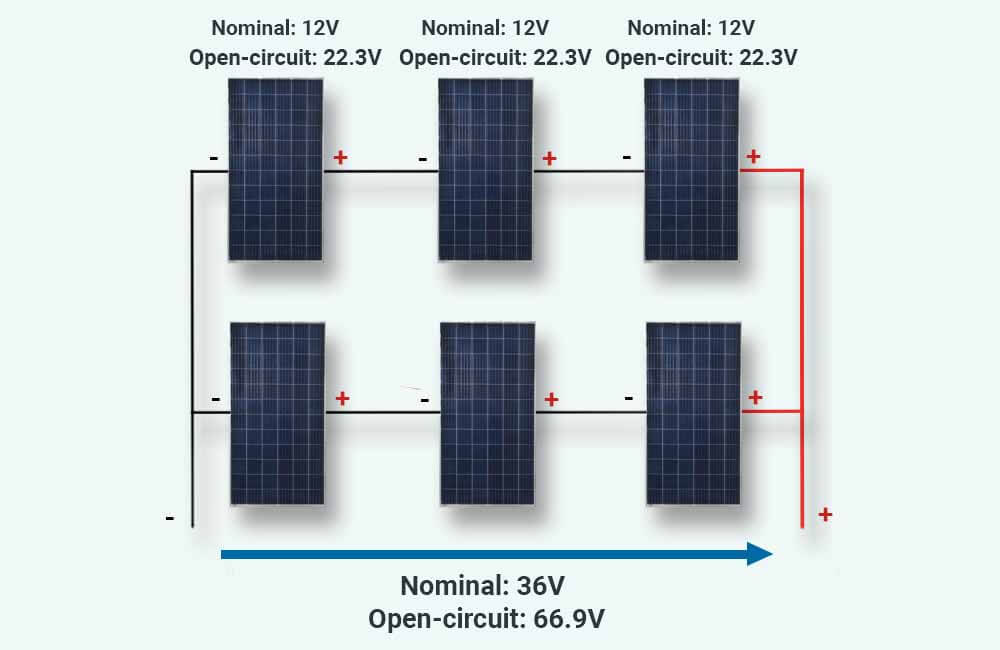
A good configuration for the battery bank would be a 2S2P configuration. This means that we’ll have 2 strings of batteries wired in parallel, with each string consisting of 2 batteries:
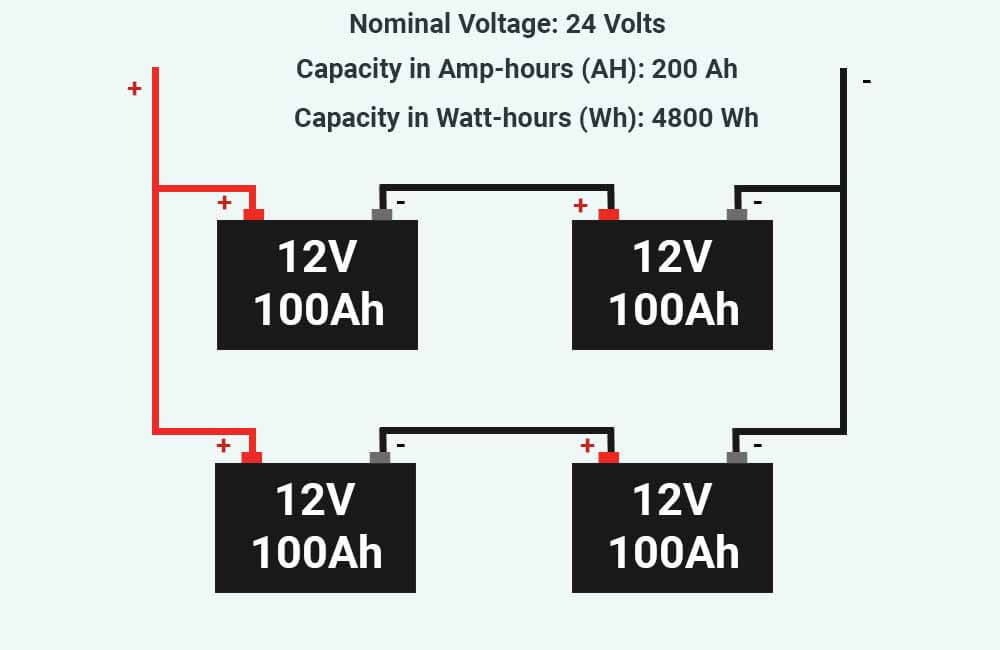
Now, based on these configurations, I’ll submit the following specifications in the calculator:
- Solar panel wattage: This is the rated wattage of each of our solar panels. Following our example, each of the solar panels is rated at 100W. That is the value that I’ll submit.
- Solar panel Open-Circuit Voltage (Voc): You’ll find this rating in the technical specifications of your solar panels. In this case, Renogy specifies 22.3 Volts as the Voc of these solar panels.
- Battery Bank’s nominal voltage: This is the nominal voltage rating of your battery setup. In our example, the battery bank is rated at 24 Volts.
- Temperature: As mentioned above, the temperature influences the voltage of the solar panels. Make sure to choose the lowest temperature that your solar panels will be exposed to during the daytime (temperatures during the night don’t matter as the solar panels will barely produce any voltage). For this example, I submitted 23°F to 31°F.
- The number of parallel strings: This is the number of parallel strings in your setup. As explained above, our setup has 2 parallel strings.
- The number of solar panels per string: In our example, each string consists of 3 solar panels in series. Therefore, I should submit 3.
Here are the results:
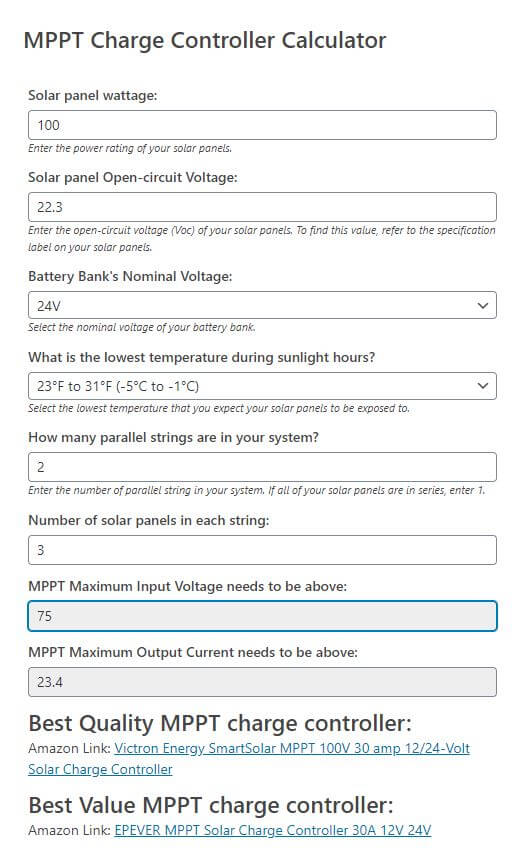
The calculator estimates that for this particular setup, we’ll need an MPPT that is rated at more than 75 Volts for its Maximum Input voltage, and more than 23.4 for its Maximum Output Current.
Once you know what size solar charge controller you’ll need, we can move on to the last component of our system. The inverter.
What size inverter to run RV AC?
The power produced by the solar panels, and the energy stored in the battery bank, is DC (Direct Current) power. And like most household appliances, the air conditioner in your RV uses AC (Alternating Current) power.
The job of an inverter is to convert the low voltage (12, 24, or 48 Volts) power from your battery bank into a higher voltage (110-130 Volts) power that your RV AC can use.
And just like the other components, the inverter needs to be sized correctly.
What are the key specifications to look at?
There are 3 specifications that should be considered When sizing an inverter for your RV air conditioner:
- Continuous Power: This is the amount of power that the inverter can continuously deliver. This specification should be higher than the maximum running wattage of your RV AC.
- Surge Power: This spec represents the amount of power that the inverter can briefly provide. Usually, the Surge Power of an inverter is double its rated wattage (Continuous Power). This specification should be higher than the power that the AC requires to start.
- Input Voltage: This specification relates to the input side of the inverter, which is the side that connects to the battery bank. An inverter that is rated at 12V for its input voltage, will not be compatible with a 24V or a 48V battery bank configuration.
Let’s see how you can match these specifications with your RV air conditioner and your battery bank specs.
What size inverter do you need to run your RV air conditioner?
Generally, an inverter that could run an RV air conditioner would be rated at 3000 to 4000 Watts. Inverters of this size should be able to handle both the continuous and surge power of your air conditioner.
On average, an RV air conditioner operates at about 1300 to 1500 Watts at full capacity. However, when these air conditioners are starting, they can draw up to 7500 watts of power.
This amount of surge power requires a big inverter. For example, a 3000W inverter usually has a surge capacity of 6000 Watts, which in some cases is not enough to start your RV AC. A better choice would be to go with a 4000W inverter.
In any case, make sure it is a Pure Sine Wave inverter (as opposed to a Modified Sine Wave one).
It is also important to note that if you add a soft starter to your RV AC, you wouldn’t have to use inverters of this size. As these devices limit the surge power of your RV ac. Click here to learn more about this topic.


Wow!! Excellent details and explanation. Thanks for going into depth about solar panels electrical requirements.
Juls