The amount of solar power that you need to run your grow lights can be calculated using the daily energy consumption of your grow lights, and the amount of sunlight that you receive in your location.
However, in addition to the solar panels, you will also need the following components:
- A solar charge controller
- A battery bank
- An inverter
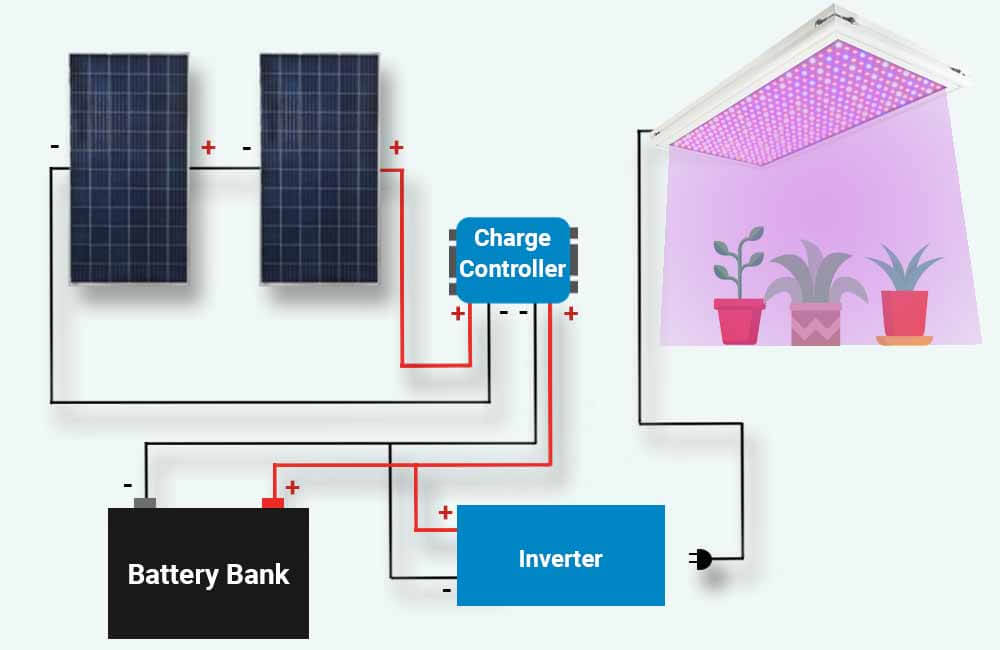
In this article, I will show you how to calculate the amount of solar power required to run your grow lights. After that, I will discuss the other solar components that you need, and how to size each of them correctly.
But before we get into that, the first step would be to determine the energy consumption of your grow lights.
I get commissions for purchases made through links in this post.
How much electricity do grow lights use?
On average, grow lights use between 25 and 35 watts of power for every square foot of coverage. The exact power usage of your grow light should be indicated by the manufacturer (in Watts). However, this rated wattage will represent the power usage of the grow light and not its energy consumption.
The daily energy consumption of a grow light, which is measured in Watt-hours or kiloWatt-hours (1 kWh = 1000 Wh), will depend on its exact power usage (watts) and the number of hours for which it runs on a daily basis.
For example, the following table provides some of the most popular grow lights, their power usage, and energy consumption over different amounts of time:
| Grow Light model | Power Usage (Watts) | Coverage | Energy Consumption over 8 hours (kWh) | Energy Consumption over 16 hours (kWh) |
| 450 Watts | 16-25 Sq. ft | 3.6 kWh (3600 Wh) | 7.2 kWh (7200 Wh) | |
| 150 Watts | 6-9 Sq. ft | 1.2 kWh (1200 Wh) | 2.4 kWh (2400 Wh) | |
| 150 Watts | 6-9 Sq. ft | 1.2 kWh (1200 Wh) | 2.4 kWh (2400 Wh) | |
| MAXSISUN PB4000 Pro | 400 Watts | 16-25 Sq. ft | 3.2 kWh (3200 Wh) | 6.4 kWh (6400 Wh) |
| 216 Watts | 6-9 Sq. ft | 1.73 kWh (1730 Wh) | 3.46 kWh (3450 Wh) |
To calculate the energy consumption of your grow lights, simply multiply each of their wattage ratings (watts) by the number of hours that they run for:
Energy Consumption (Watt-hours) = Wattage Rating (Watts) x Run Time (hours)
For example, let’s assume I’m using 2 of these SPIDER FARMER SF-4000 grow lights for 2 (4x4ft) grow tents. Let’s also assume that I run these grow lights for 12 hours a day.
Now, according to the manufacturer, each of these panels uses 450 watts of power. Therefore, when they’re on, the total power usage of these grow lights is 900 watts (450w x 2).
With the assumption that they run for 12 hours a day, the daily energy consumption of these grow lights is:
Daily Energy Consumption (Watt-hours) = Wattage Rating (Watts) x Run Time (hours)
Daily Energy Consumption (Watt-hours) = 900 Watts x 12 hours
Daily Energy Consumption (Watt-hours) = 10800 Watt-hours
Daily Energy Consumption (kiloWatt-hours) = 10.8 kWh
According to these calculations, the grow lights would consume 10.8 kWh of energy every single day. This means that our solar setup should be able to provide 10.8 kWh of energy on a daily basis.
Once you’ve determined the energy consumption of your grow lights, the next step would be to calculate the amount of solar power that could offset that energy usage.
How many solar panels to run grow light?
The amount of solar power that you need to run your grow lights, does not only depend on the energy consumption of your grow lights but also on the amount of sunlight that your solar panels would receive. The amount of sunlight that your solar panels get, would mainly depend on your location.
However, as a rule of thumb, you would need 200 to 300 watts of solar panels for every 1 kWh of daily energy that your grow lights consume. For example, if your grow lights use 3 kWh of energy every day, you would need 600 to 900 watts of solar power to offset that energy consumption.
To get a more accurate estimate, you would have to determine the average amount of sunlight energy that you receive each day. But, how do you do that?
The answer is Peak Sun Hours.
Let me explain:
The amount of sunlight energy that an area receives (over a certain period of time) is quantifiable, and in solar PV system applications, it is measured in kWh/m² (kiloWatt-hours per square meter) and referred to as Peak Sun Hours. 1 Peak Sun Hour is equivalent to 1 kWh/m² (1000 Wh/m²).
Peak Sun Hours can be used to calculate the amount of energy that a solar panel is capable of producing in a certain location:
Daily Energy Production (Watt-hours) = Solar Power Rating (Watts) x Peak Sun Hours per day
For example, a 200W solar panel that is installed in a location that – on average – receives 6 Peak Sun Hours per day (6 kWh/m²/day), would – on average – generate 1.2 kWh of energy per day:
Daily Energy Production (Watt-hours) = Solar Power Rating (Watts) x Peak Sun Hours per day
Daily Energy Production (Watt-hours) = 200 Watts x 6 Peak Sun Hours per day
Daily Energy Production (Watt-hours) = 1200 Watt-hours per day
Daily Energy Production (kiloWatt-hours) = 1.2 kWh/day
Related: How much power does a 200w solar panel produce?
Reversibly, if you know how much energy you’ll need the solar panel(s) to produce each day, you can use the daily Peak Sun Hours that you get to calculate the amount of solar power that you need:
Solar Power Needed (Watts) = Daily Energy Consumption (Watts) ÷ Peak Sun Hours per day
For example, if you need the solar panels to produce 2 kWh of energy every day, and you get 5 Peak Sun Hours per day, you would need 400 Watts of solar power:
Solar Power Needed (Watts) = Daily Energy Consumption (Watt-hours) ÷ Peak Sun Hours per day
Solar Power Needed (Watts) = 2000 Watt-hours ÷ 5 Peak Sun Hours per day
Solar Power Needed (Watts) = 400 Watts
We’ve already discussed the energy consumption of your grow lights, therefore, the only question that remains is: How many Peak Sun Hours do you get each day?
Your Peak Sun Hours can be easily determined using the PVWatts Calculator by The National Renewable Energy Laboratory (NREL). All you’ll need to do is submit your address:
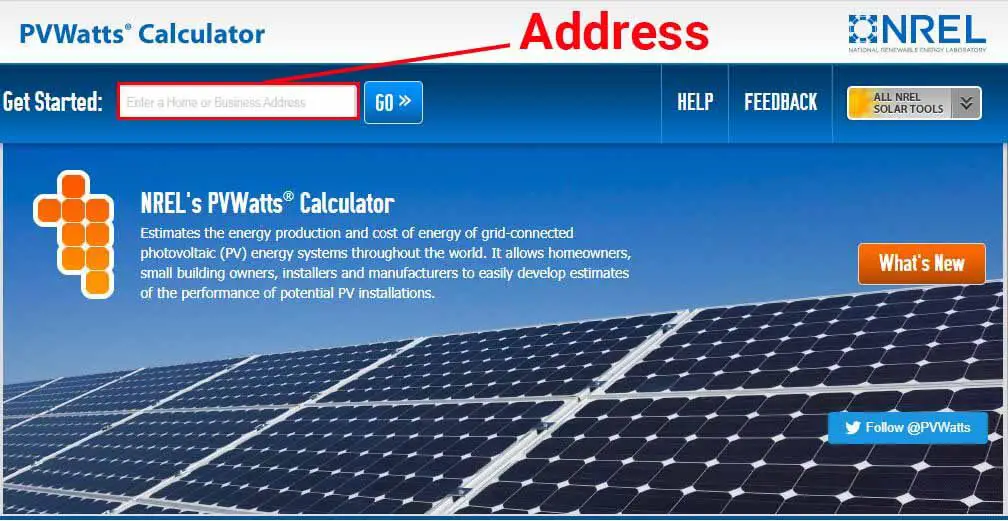
Once you submit your address, in the Results section, the calculator will provide the annual and monthly averages of the daily Peak Sun Hours that you get.
For example, I submitted an address in Phoenix, Arizona, and the calculator provided the following:
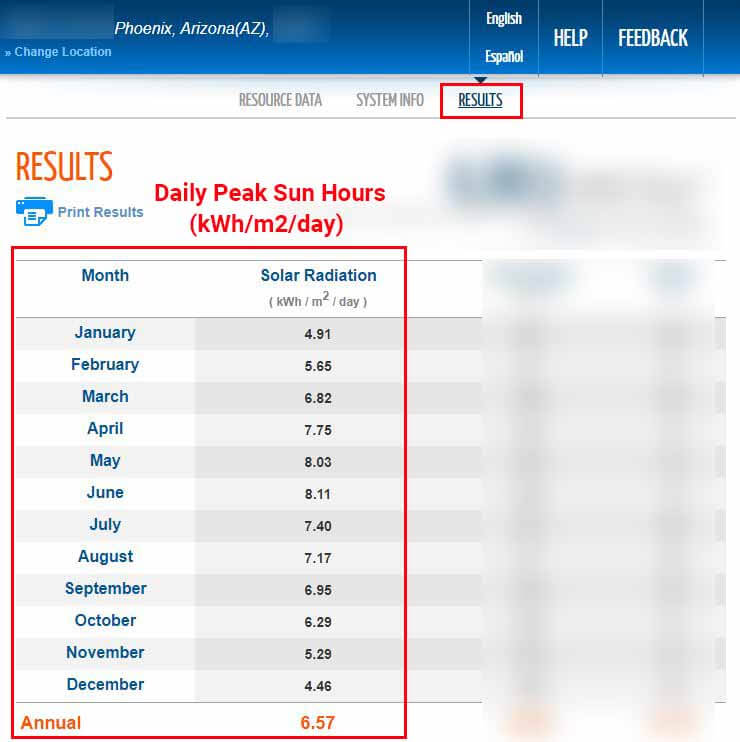
According to the PVWatts Calculator, our solar panels would receive 6.57 Peak Sun Hours per day (on average) throughout the year. The calculator also provides monthly averages.
A good rule of thumb would be to use the lowest Peak Sun Hours value. This is to ensure that even in the winter when sunlight is relatively scarce, the solar panels would still produce enough energy to run the grow lights.
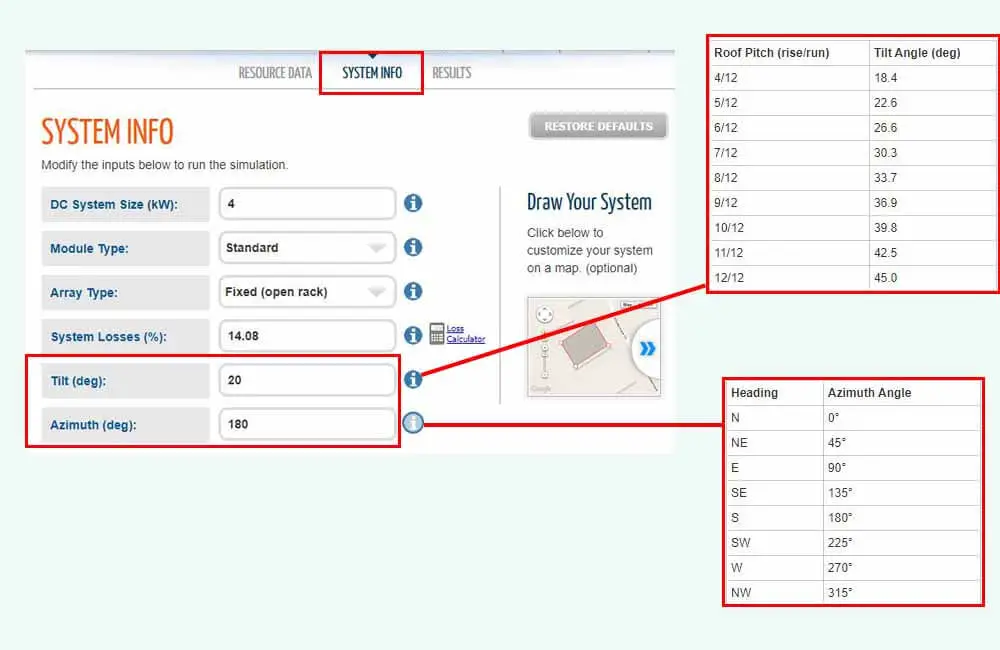
It is also important to note that these results are based on the assumption that the solar panels will be facing south, and tilted at an angle of 20 degrees. However, these settings can be modified in the System Info section of the tool:
Once you determine the Peak Sun Hours that you get, the last step would be to calculate the amount of solar power that you need:
Solar Power Needed (Watts) = Daily Energy Consumption (Watt-hours) ÷ Peak Sun Hours per day
Following our previous example, we’ve determined that our 2 grow light panels consume 10.8 kWh per day. And since we want the solar panels to generate this amount of energy every day, throughout the year, we’ll use the Peak Sun Hours from December (4.46 PSH):
Solar Power Needed (Watts) = Daily Energy Consumption (Watt-hours) ÷ Peak Sun Hours per day
Solar Power Needed (Watts) = 10800 Watt-hours ÷ 4.46 Peak Sun Hours
Solar Power Needed (Watts) = 2421 Watts
Now, 2421 watts of solar will – on average – generate 10.8 kWh of energy every day in December but will generate a lot more in other months.
For example, the Peak Sun Hours in June is 8.11. This means that our 2421 Watts of solar will – on average – generate 19.6 kWh/day in June.
Unless the battery bank is big enough to store this energy, and you’re planning on using it, that extra energy will go to waste. In other words, for most of the year, you would have more solar panels than you need, for no reason at all.
However, there is a solution to this.
If we go to the System Info section of the calculator and increase the title angle just enough, our solar panels would still get the least amount of sunlight in December, but the values of the Peak Sun Hours that our solar panels would get, will not fluctuate as much throughout the year.
For example, I increased the tilt angle from 20 degrees to 45 degrees, and here are the new results that the tool provided:
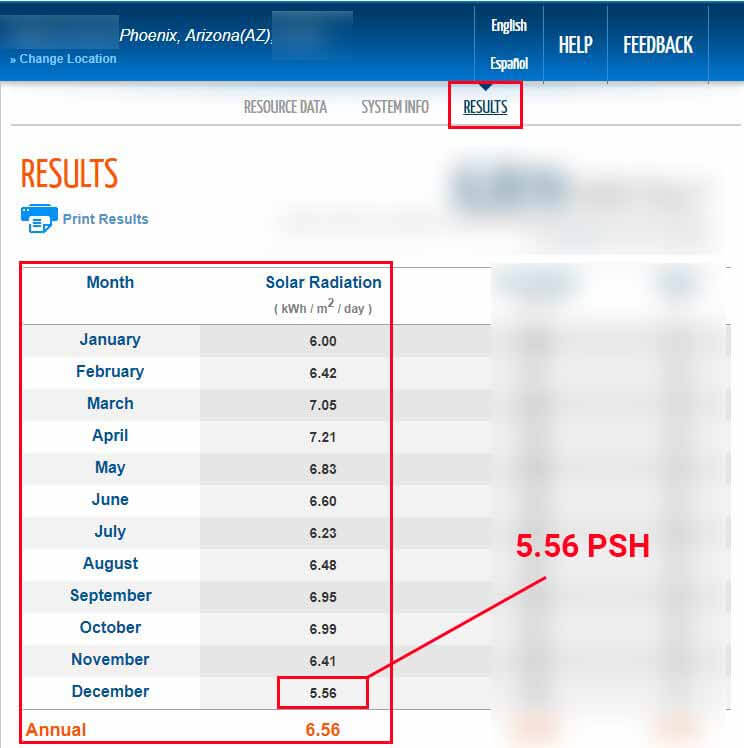
You can see that with this new configuration, the Peak Sun Hours in December are still the lowest, but have increased from 4.46 to 5.56 Peak Sun Hours/day.
This is due to the fact that in the winter, the sun is closer to the horizon. By increasing the tilt angle, the solar panels will generally get more direct sunlight during these months.
Related: do solar panels need direct sunlight to work?
Now let’s calculate the amount of solar power that we need with this new config.:
Solar Power Needed (Watts) = Daily Energy Consumption (Watt-hours) ÷ Peak Sun Hours per day
Solar Power Needed (Watts) = 10800 Watt-hours ÷ 5.56 Peak Sun Hours
Solar Power Needed (Watts) = 1942 Watts
With this small modification, we were able to decrease the amount of solar power that we need by around 500 Watts while ensuring a daily energy production of at least 10.8 kWh throughout the year. However, keep in mind that for this to work, the solar panels will have to be tilted at a 45-degree angle.
Another important thing to add is that solar systems are never 100% energy-efficient, and there are going to be losses (inverter, batteries, wires, etc..).
In other words, the solar panels will generate 10.8 kWh/day, but once that electricity goes through the charge controller, the batteries, and the inverter, it will have decreased. But, by how much?
Well, the efficiency of solar systems differs depending on the setup, however, as a rule of thumb, the losses will generally be around 15%. So a good rule of thumb would be to divide the initial results by 0.85:
Solar Power Needed (Watts) = 1942 Watts ÷ 0.85
Solar Power Needed (Watts) = 2285 Watts
According to our calculations, we would need (at least) 2285 watts of solar panels for an average energy production of 10.8 kWh/day.
The next step is to size our battery bank.
How many batteries do you need to run your grow lights on solar?
The job of the batteries (battery bank) is to store the energy generated by the solar panels and make that energy available at all times. In other words, the battery bank needs to be big enough to store and supply the daily energy demands of your grow lights.
The exact size of the battery bank will depend not only on the daily energy consumption of your grow lights but also on the type of batteries you’re using.
However, as a rule of thumb, you would need a 12V-100Ah lithium battery for every 1 kWh that your grow lights consume throughout the day, or 2 12V- 100Ah lead-acid batteries for every 1 kWh of daily energy consumption.
The reason you need different amounts of battery storage for each battery type is that these 2 battery chemistries (lithium and lead-acid) have different acceptable Depths of Discharge (DOD).
What does that mean?
In general, the deeper you repeatedly discharge a battery, the faster it loses its overall capacity and the shorter it will last. However, some battery chemistries offer more usable capacity than others.
For example, let’s consider 2 different 12V-100Ah batteries, a Lithium-Iron-Phosphate (LiFePO4) battery, and a deep-cycle AGM Lead-Acid battery.
The recommended Depth of Discharge (DOD) for lithium batteries is usually 80%. At an 80% DOD, the lithium battery can last 7 to 10 years.
In other words, the 12V-100Ah lithium battery can supply around 1kWh of energy every day for at least 7 years. By the end of those 7 years, the battery will still hold 60-80% of its initial capacity.
On the other hand, the recommended Depth of Discharge for lead-acid batteries is 50%. At a 50% DOD, the lead-acid battery will only last up to 3 years.
This means that in order for it to last 3 years, a 12V-100Ah lead-acid battery can only supply 0.6 kWh of energy per cycle (day). If the same battery supplied 1kWh of energy every day, it would only last about 500 cycles, which equates to about a year and a half.
In any case, whatever the type of batteries you’ll be going for, make sure to take the recommended Depth of Discharge of the battery into consideration when sizing the battery bank.
To calculate the size of the battery bank that you need, simply divide the daily energy consumption of your grow lights, by the recommended depth of discharge of the batteries you’ll be using.
Following our previous example, let’s say we need to supply 10.8 kWh of energy every day to our grow lights and let’s also assume we’ll be using lithium batteries for our setup.
As mentioned above, these batteries have a recommended DOD of 80%. The size of our battery bank can be calculated as such:
Battery Bank Capacity (Watt-hours) = Daily Energy Consumption (Watt-hours) ÷ 80%
Battery Bank Capacity (Watt-hours) = 10800 Watt-hours ÷ 0.8
Battery Bank Capacity (Watt-hours) = 13500 Watt-hours
Battery Bank Capacity (kWh) = 13.5 kWh
According to our calculations, the battery bank needs to be rated at 13.5 kWh (13500 Wh). If we use 12V-100Ah (1200 Wh) batteries, such as these Ampere Time batteries, the number of batteries that are required can be calculated as such:
Number of 12V 100Ah batteries = Battery Bank Capacity (Wh) ÷ (12 x 100)
Number of 12V 100Ah batteries = 13500 Wh ÷ 1200 Wh
Number of 12V 100Ah batteries = 11.25
Since you can’t really buy a quarter of a battery, 11.25 means that we would need 12 of the 12V-100Ah LiFePO4 batteries. With this setup, we would have 14.4 kWh of nominal battery capacity.
If we use bigger batteries, such as these EG4 (Gyll) batteries, which are rated at 48V-100Ah (4800 Wh) nominal, we would need 3:
Number of 12V 100Ah batteries = Battery Bank Capacity (Wh) ÷ (48 x 100)
Number of 12V 100Ah batteries = 13500 Wh ÷ 4800 Wh
Number of 12V 100Ah batteries = 2.81
In any case, once you calculate the size of the battery bank that you need, the next step is to size the solar charge controller.
What size solar charge controller do you need?
A solar charge controller connects the solar panels to the battery bank, and its main function is to regulate the voltage coming from the solar panels to prevent the battery from overcharging.
Also, at night when the solar panels are barely producing any voltage, the battery bank will naturally discharge into the solar panels, which will drain the battery bank and damage the solar panels. A solar charge controller prevents that from happening.
Related: What is a solar charge controller and why do you need one?
Before we get into the process of sizing the solar charge controller, note that there are 2 types of charge controllers out there:
- PWM solar charge controllers: PWM stands for Pulse Width Modulation, and these types of charge controllers are cheaper but are generally less efficient.
- MPPT solar charge controllers: MPPT stands for Maximum Power Point Tracking, and these solar charge controllers are highly efficient but are relatively expensive.
For the rest of this guide, I’ll focus on MPPT charge controllers as they are the better long-term option. If you’re more interested in a cheaper solution, you can learn more about PWM charge controllers here, or directly use our PWM charge controller size calculator.
So, how do you select the right MPPT charge controller for your system?
There are 3 main specifications to look for in an MPPT:
- Input Voltage: This specification relates to the input side of the charge controller. The MPPT you choose needs to be able to handle the highest voltage that your solar panels could produce.
- Output Voltage: This specification relates to the output side of the charge controller. The MPPT you choose needs to be compatible with your battery configuration. For example, if you have a 48V (nominal) battery bank, the MPPT needs to be designed for 48 Volts.
- Output current: This is the main specification, and it describes the maximum amount of current that the charge controller is designed to output. For example, a 30 Amp MPPT will not output more than 30A of current.
Now, these variables make it a little confusing to select the right charge controller, to make this process easier for you, I’ve programmed an MPPT Calculator that does all the sizing for you.
All you have to do is submit some details that describe your solar array and battery bank’s size and configuration (which I’ll explain below), and the calculator will provide a couple of links to suitable MPPTs:
To understand how this works, let’s consider the following example:
First, let’s say you’ve sized the solar array and determined that you need 800 watts of solar power to run your grow lights. To make an 800W solar array, let’s say you chose to go with 8 solar panels that are rated at 12 volts (nominal) and 100 watts each.
Now, as mentioned above, the MPPT charge controller needs to be able to handle the highest voltage that our solar panels could produce. This maximum value depends on 3 things:
- The Open-Circuit Voltage (Voc) of each solar panel: this value is provided by the manufacturer.
- The configuration of your solar panels: how are your solar panels wired? the more solar panels you have connected in series (positive to negative), the higher the voltage.
- The lowest temperature during sunlight hours: this represents the lowest temperature that you estimate your solar panels are ever going to be exposed to during the daytime. The lower the temperature, the higher the voltage.
For this example, let’s say the manufacturer of your solar panels specifies 22.3V as the Open-Circuit Voltage of each solar panel. And let’s also say that you live in an area in which the temperature does not go below 32°F (0°C) during sunlight hours.
For the configuration, let’s say you chose to wire the solar panels in a 4S2P configuration. This means that you would have 2 parallel strings of solar panels, with each string consisting of 4 solar panels wired in series. The setup would look like this:
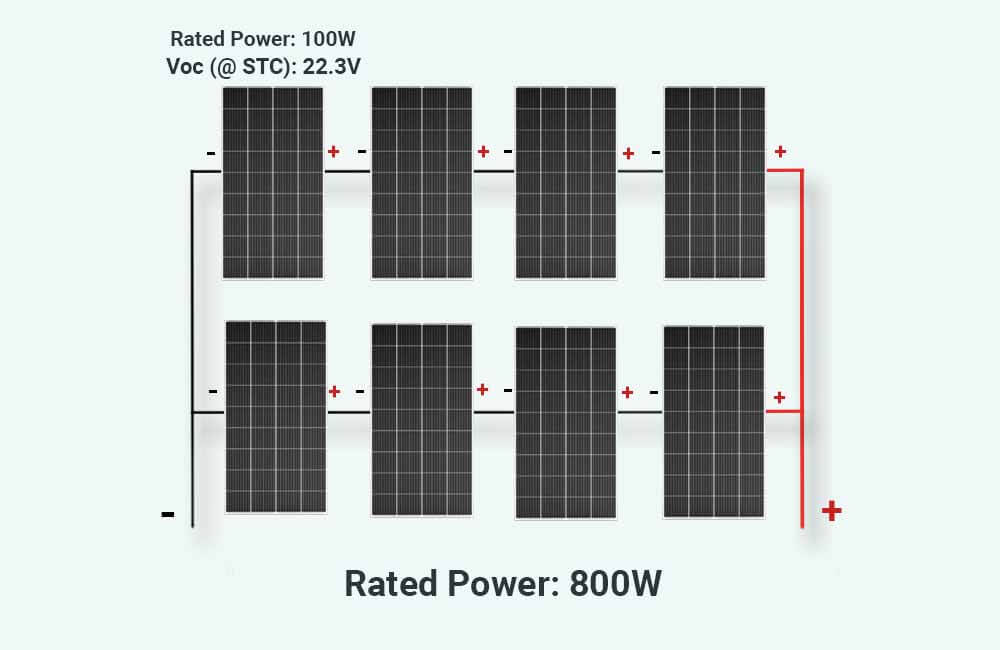
Now, for the battery bank, let’s assume that you’ve determined that you’ll need 6 12V-100AH lithium batteries. Let’s also assume that these batteries will be wired in a 3S2P configuration.
This means that your battery bank will consist of 2 parallel strings, with each string consisting of 3 batteries wired in series:
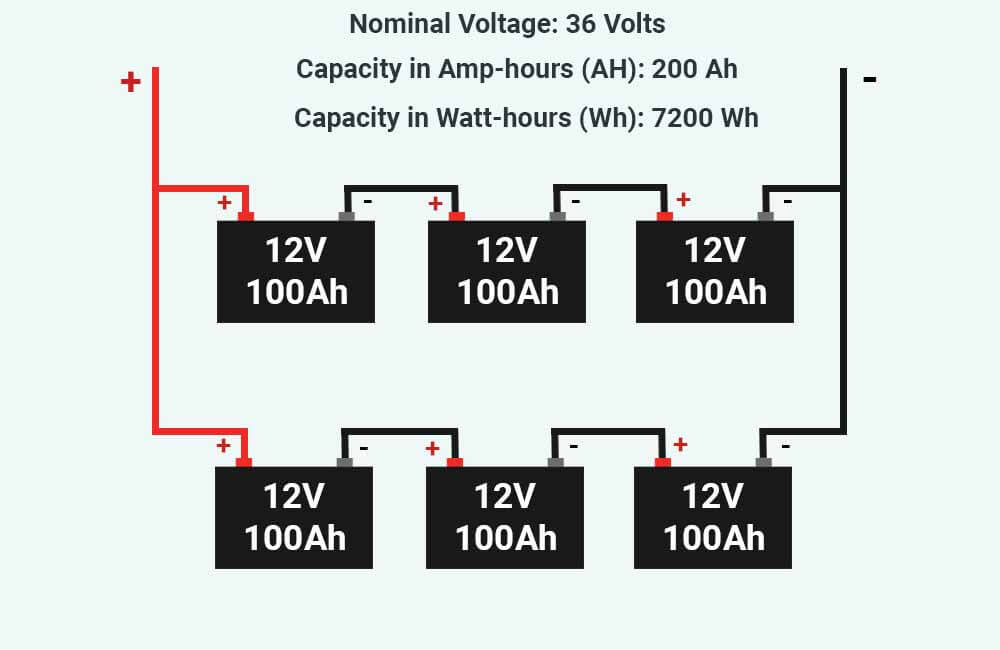
So now, the battery bank is rated at 36 Volts (nominal).
To sum this up, here are the specifications that will be submitted to the MPPT calculator:
- Solar panel wattage: Each of the solar panels is rated at 100 Watts.
- Solar panel open-circuit voltage: Each of these solar panels has an Open-Circuit Voltage (Voc) of 22.3 Volts.
- Battery bank’s nominal voltage: The battery bank has a nominal voltage of 36 Volts.
- The lowest temperature during sunlight hours: The temperature does not go below 32°F (0°C) in the daytime.
- The number of strings: The solar array consists of 2 strings of solar panels.
- The number of solar panels in each string: Each string consists of 4 solar panels connected in series.
I’ve submitted these specifications to the MPPT solar calculator, and here are the results:
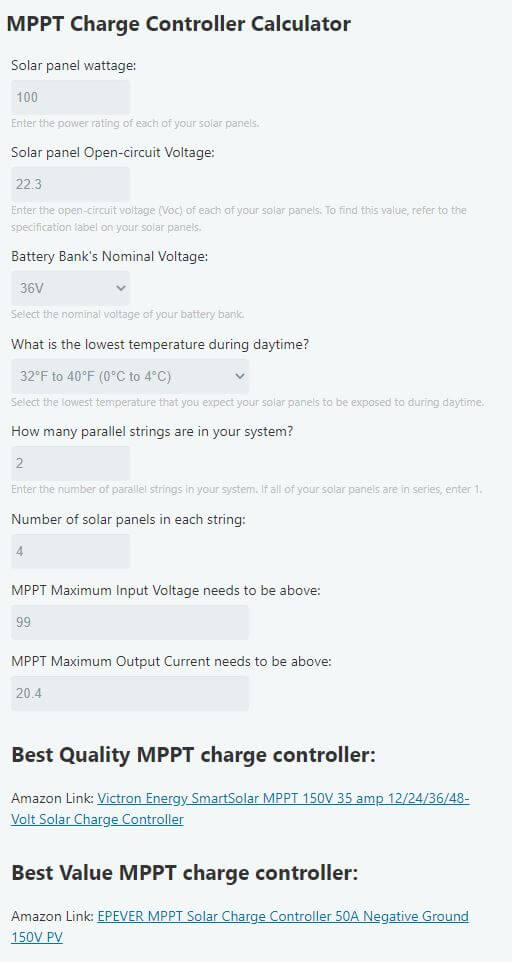
According to the calculator, the MPPT needs to have a Maximum Input Voltage of more than 99 Volts and an Output Current Rating of more than 20.4 Amps. Also, the MPPT charge controller should be compatible with a 36V battery bank.
The calculator then provided links to 2 MPPTs that would do the job, and that would also allow future system expansion.
Now that we’ve calculated the sizes of the solar array, battery bank, and MPPT solar charge controller, the last and easiest step is to size the inverter.
What size inverter do you need to run your grow lights?
The size of the inverter you need to run your grow lights will mainly depend on 2 variables:
- The combined power usage (wattage) of your grow lights.
- The voltage of your battery bank.
To find the right inverter for your grow lights, make sure that the Continuous Power rating (in Watts) of the inverter is higher than the combined power usage of your grow lights, and that the Input Voltage rating (VDC) of the inverter is compatible with your battery bank’s nominal voltage.
For example, if you have 3 grow lights that are rated at 150 watts each, the total power usage of these lights is 450 watts. The inverter that could run these lights should have a Continuous Power rating of more than 450 watts.
In this particular case, inverters with a Continuous Power rating between 500 and 1500 watts will do the job.
If you’re planning on running other appliances on the same inverter, make sure to get a big enough inverter (1500 or 2000 Watts of continuous power).
However, an important thing to take into consideration is that the inverter you choose should also be designed to operate at your battery bank’s voltage.
For example, if your solar setup has a 24V battery bank, the inverter should be able to operate at 24VDC.


Well written and very informative.
Thanks so very much for this invaluable information. I have researched this for quite some time and to find all the answers in one well written article is really fantastic. Thanks again and good job.
I personally want to find out how to run my spider farmer sf7000’s directly from a 48volt battery bank, with a regulator of some sort but eliminating the inverter to ac back down to DC through the led power supply. As far as I can see there is no need to go to ac and back to DC when most led grow lights end up operating at 36 dc volts anyway. It’s the current drive that I need to figure put.
Thanks again