Having a backup battery for my refrigerator turned out to be a great idea, especially when I used to live in an area with frequent power outages.
In this tutorial, I’ll guide you step-by-step on how to run your refrigerator on a battery. These are the exact steps I followed to create a DIY backup battery for my fridge, and it proved to be worth it on a few occasions.
Plus, as you’ll see in this tutorial, all you need are a couple of pieces of equipment that are very simple to put together.
Let’s jump right in!
I get commissions for purchases made through links in this post.
Video: Making a backup battery for your fridge
Here’s a video version of this tutorial. Check it out!
How to run a refrigerator on a battery?
To power your fridge with a battery, you’ll need the following components:
- A Battery Bank: This will provide the energy required to run your refrigerator. The battery bank can consist of a single battery or multiple batteries wired together.
- A Power Inverter: his device converts the DC (Direct Current) power from the battery bank into AC (Alternating Current) power, which your fridge needs to operate.
- Cables: You’ll need a pair of cables to wire the battery bank to the inverter. These cables typically have lugs on both ends or lugs on one end and alligator clips on the other for easy connection.

For example, for my particular backup battery setup, I used the following components:
- A 12V – 100Ah battery.
- A 12V – 500 Watt inverter.
- And a pair of 2 AWG copper wires to connect the inverter to the battery.
But to be clear, this setup fits my needs because I have a relatively small refrigerator, similar to an RV fridge, with a storage capacity of only 7 cubic feet (200 liters or 2100 quarts). So, this is not a one-size-fits-all setup.
If you want a one-size-fits-all setup, you could use the following components:
- A 24V – 100Ah battery.
- A 24V – 2000 Watt inverter.
- And a pair of 1/0 AWG copper wires to connect the inverter to the battery.
You can use this setup as is or refer to the sizing sections below for more information on how to properly size these pieces of equipment.
Once you have your battery, inverter, and cables, you can start by connecting the cables to the terminals of the inverter.
The terminals are color-coded, with black indicating negative and red indicating positive.

So, all you have to do is connect the black cable to the negative terminal of the inverter, and the red cable to its positive terminal.

Next, you’ll connect the inverter to the battery.
Start by connecting the negative wire from the inverter to the negative (black) terminal of the battery:

After connecting the negative wire, connect the positive wire from the inverter to the positive terminal of the battery:

When connecting the positives, you might see a spark at the battery terminal. Don’t worry; this is simply the inrush of current flowing from the battery to the capacitor inside the inverter, so seeing a spark is normal.
A handy trick is to quickly touch the cable to the terminal of the battery and get that spark out of the way. Once you’ve seen the spark, you can safely connect the cable to the terminal.
And that’s all there is to it!
Here’s what my backup battery setup looked like after I put everything together:

Once everything is set up, you can plug your refrigerator into the inverter and switch the inverter on.


You can check if everything is working as it should by opening your refrigerator and checking if the light is on. But in my experience, the real test is to wait a few moments for the fridge’s compressor to kick in.
When the compressor is starting up, the inverter might struggle a little bit due to the initial high power demand, this is especially an issue if the inverter is undersized.
But if you use the right size inverter for your refrigerator, the compressor should start up without a hitch.

And voila! We have ourselves a battery-powered refrigerator!


What size battery backup will you need for your refrigerator?
For my particular battery backup, I used a single 12V 100Ah battery. With these ratings, this battery can store and supply up to 1200 Wh (1.2 kWh) of energy on a single charge.
And after testing how long my fridge could run on this battery, I found out that it could power the fridge for up to 14 hours straight. That’s more than enough for me, considering power outages in my area don’t typically last longer than a few hours.
But just to be safe, I had an extra battery on hand. This way, I could connect it to the existing one to create a larger battery bank if I needed to.
Based on my experience, one of these batteries should keep most residential refrigerators running for at least 6 to 12 hours.
However, depending on the electricity usage of your refrigerator, and also on how long you want the battery backup to be able to run the fridge, you may need a larger battery bank.
For most cases, I would recommend using a large battery like the 24V 100Ah LiFePO4 Battery from Redodo, which can provide up to 2400 Wh (2.4 kWh) of energy on a single charge. This amount of energy is enough to keep most refrigerators running for 12 to 24 hours.
Alternatively, you can connect multiple 12V 100Ah batteries together, either in parallel or in series.
Now, if you plan to use the battery bank to run the refrigerator on solar power, the type of batteries you’ll be using will influence the size of the battery backup needed to run your refrigerator.
Related: Can a 100W solar panel run a fridge?
If you’re using Lead-Acid batteries, you’ll need to double the size of the battery bank. Lead-Acid batteries can only be discharged to 50% of their rated capacity to maintain their lifespan. Going beyond this limit significantly shortens their longevity.
A lithium battery bank, on the other hand, will provide 100% of its rated capacity every time you discharge it, and will still last through thousands of charge/discharge cycles.
But if the backup battery bank is only for emergencies, you can use Lead-Acid batteries without needing to double up the size of the battery bank.
Most deep-cycle Lead Acid batteries will still provide 200 to 300 charge/discharge cycles at a Depth Of Discharge of 100%. This is more than enough if the battery bank is only for occasional use.
To learn more, check out my article on sizing a battery backup for your refrigerator.
What size inverter will you need to run the fridge?
If you have a 12V refrigerator, you can hook it straight up to the battery. But for a residential fridge running on 120V or 240V AC, you’ll need an inverter to switch the battery’s DC power to AC.
In my setup, I’ve got a 12V 500-watt Pure Sine Wave inverter. Since my fridge is on the smaller side, like an RV fridge, this inverter size does the job fine.
However, the inverter will sometimes struggle to start my fridge, as this inverter has just about enough Peak Wattage Capacity to turn on the fridge.
It even failed to start it up a couple of times because of it, and I had to tweak the fridge settings initially to make it easier for the inverter to start it up.
So, as a general rule of thumb, I recommend using a 1500-watt Pure Sine Wave inverter for your refrigerator. An inverter of this size should handle most refrigerators smoothly. But if you want to play it extra safe, go for a 2000-watt Pure Sine Wave inverter.
Just make sure it’s a Pure Sine Wave inverter and not a Modified Sine Wave one. The former gives a smoother signal, closer to what utility companies provide.
These suggestions are based on assuming the fridge is the only thing running on the battery. If you’ve got other devices in the mix, you’ll need a bigger inverter.
As I explain in my article on sizing an inverter for your refrigerator, the proper way to size the inverter is to calculate your power (Watts) needs, both Continuous and Surge, and ensure your inverter covers these requirements.


In addition to that, you need to make sure that the Input Voltage rating of the inverter matches the Voltage rating of your battery bank.
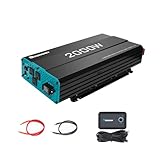
For example, if you’re going to use a 24V battery bank like the 24V 100Ah LiFePO4 Battery from Redodo, the inverter you use should have an Input Voltage rating of 24 Volts, like the 24 Volt 2000W inverter from VOLTWORKS.
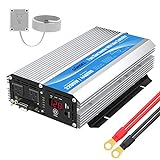
But if you’re going to use a 12V battery bank like the 12V 200Ah LiFePO4 Redodo Battery, which provides the same amount of energy but at a different voltage, you’ll need to use a 12V inverter like the 12 Volt 2000W inverter from Renogy.
The main difference between these setups will be the size of the wires required to connect the battery to the inverter.
For example, the 24V setup would require 1/0 AWG wires to connect the inverter to the battery. On the other hand, the 12V setup would require 4/0 wires.
This is because higher voltage (Volts) means lower current (Amps), which in turn means thinner wires can be used.
If you plan to wire multiple batteries for your setup, I suggest wiring them in series to create a 24V or even a 48V battery bank instead of a 12V one. This way, you can use thinner wires while ensuring the safety of your setup.
Once you’ve determined the size of your battery bank and inverter, you can use this inverter-to-battery wire size calculator to properly size the wires needed.

Thanks for the video. How does the lithium battery get charged so that it’s ready to plug my fridge in during a power failure?
Hello Jennifer,
You can use solar panels to keep the batteries charged.
Not sure how big your fridge is or how much energy it consumes on a daily basis, but in general, 500 Watts of solar panels should be more than enough to keep the fridge up an running day in day out.
Check out this article for more details.
Have a good one.